All You Need To Know About Azure DevOps Test Plans
Document Your Azure DevOps Test Plans from Your Project!

Building your documents for your Azure DevOps Test Plans as a Business Analyst or Test Lead can be a daunting task.
The same thing is true for requirements that live within your Azure DevOps project, but Azure Test Plans poses a unique challenge.
In this article you get a brief overview of what the Azure DevOps Test Plans module is how it works, and how you can document your test outcomes easily. You will also learn about the architecture of Azure DevOps itself.
For a quick overview, you can skip down to the video
- What Is Azure DevOps Test Plans?
- How Does Test Plans work?
- How Do I Choose a Test Suite Type?
- Building Your First Test Plan
- Running Your First Test Plan
- Getting Results and Iterating
- Documenting Your Test Plan
What is Azure DevOps Test Plans?
Azure Test Plans is a test management module within Azure DevOps that lets users manage test plans, test suites, and test cases for everyone in the software development process. Using test plans, you can Azure Test Plans also provides a browser extension for exploratory testing and gathering feedback from stakeholders.
Azure DevOps (ADO) is a great place for your Quality Assurance team to build out their Test Plans for a given project. By bringing your Testing Team onto the Azure DevOps platform, you can effectively use your ADO project as your single source of truth.
You can have your developers using the repos and tying development work to requirements, you can have your business analysis teams building requirements and attaching test cases, and you can have your QA team using those Test Cases, and requirements made by the BA team, to run all of your Testing.
Now Azure DevOps Test Plans can be used for both automated and manual testing. But this article only focuses on manual testing on ADO test plans.
Test Plans is an incredible place for your team to do their manual testing needs for many reasons:
Stakeholder Feedback
The biggest advantage of Test Plans is letting your testing teamwork with your Business Analysis and development teams in the same environment. By doing this, you create a single source of truth for everyone working on a project.
By deploying your manual testing operations from here, you can directly interact with the Test Cases that were already built inside of your Azure DevOps project. So the contributions of your Business Analysis team when building test cases will easily be pulled into your testing workflow. This capability adds a great benefit for teams who have BAs that are capable of building Test Cases for the QA team – if you’re a BA who does this, you will see how it works later in the article.
Robust Manual Testing Features
Test Plans also offers some incredibly helpful manual testing features to help your testers provide meaningful input on the outcome or results of their testsbeyond simply marking a specific test step as passed or failed. It also provides an interactive window for both marking the outcome of individual test steps, capturing live screenshots/recordings, and providing comments tied directly to the run of that test case.
So, when you review any Test Runs that you have completed, you can identify what your tester was experiencing when they marked an individual test step as blocked or failed. This level of insight means that even an external manual testing team can contribute thoughtfully and allow teams to identify and interpret failed results easily.
Easy Extensibility
With the right test case management tools, you can generate Smart Reports and Horizontal Traceability Matrices on the details of Test Plans, Test Suites, Test Cases, Test Runs, Test Case Runs, and Test Case Step Runs.
Tools like this can change the functionality of Test Plans to reflect how companies manage test cases through virtual linking.

How Does Test Plans Work?
Every month, Google gets thousands of searches asking how ADO testing works. One reason may be that most teams use proprietary, in-house solutions that are built for testing that are separate from ADO Test Plans.
Before learning how ADO Test Plans works, it’s worth knowing the relevant terminology. Azure Test Plans gives you three main types of test management artifacts:
- Test Plan: It is a container made of configurations, test suites, and test cases which you can divide into shared test steps and use parameters. You can group test suites and individual test cases together. Test plans include static test suites, requirement-based suites and query-based suites.
- Test Suite: It is a group of test cases that investigate distinct scenarios under an overarching test plan. Grouping cases makes it easier to see which scenarios are complete.
- Test Case: It is a step or series of steps to validate individual parts of your code or app deployment. Using a test case, you can check if your code works correctly and meets business and customer needs. You can create test cases under a test plan without needing to create a test suite.
Sometimes the terminology can be confusing, as many teams say “test plan” when they mean “test suite.”
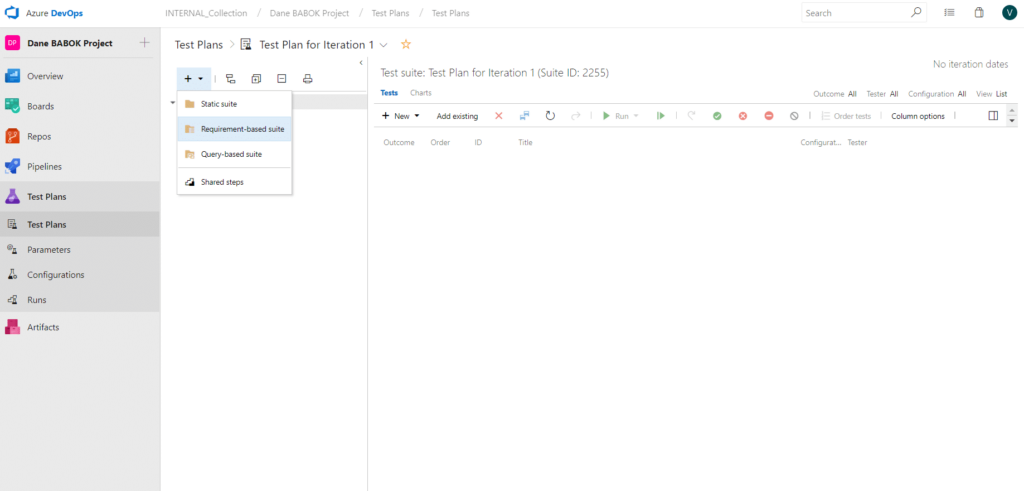
If your team creates a Test Suite, they must choose between three different kinds of test suites, as shown below:
Test Plan 1:
Test plans contain test suites.
Test suites can be of three types. Read each of the following suites to see the three different types.
- Test Suite 1
- Test Suite 2
- Test Suite 3
Test Suite 1 – Req-based
Requirements-based test suites are the simplest and most traceable. They pull in all of the Test Cases for a given Requirement.
- Test Case 1
- Test Case 2
Test Suite 2 – Query Based
Query-based test suites pull in a group of tests from your project, irrespective of what requirements the test cases are linked to.
- Test Case 3
- Test Case 4
Test Suite 3 – Static Based
Static-based test suites are used either as containers to group other test suites, or to group a specific set of test cases.
- Test Case 5
- Test Case 6
- Test Suite 1
- Test Suite 2
epending on which Test Suite you create, building a Test Suite allows you to pull in all the Test Cases that you want to test.
Once you create your Test Suite with their respective Test Cases, you can execute the entire Suite, which is known as a Test Run.
Before beginning your Test Run, you must choose between three different kinds of Test Suites to execute: Requirements-based, Query-based, and Static.
How do I choose a Test Suite type?
Before starting your Test Run, you must choose between three different kinds of Test Suites to execute: Requirements-based, Query-based, and Static. Remember: Test Suites (of any type) can only include Test Cases.
1) Requirements-based Test Suite
A Requirements-based Test Suite is one in which you associate your Test Cases to a requirement to define its acceptance criteria.
Creating a Requirements-based Test Suite will pull in all the Test Cases for that requirement. When building a suite, you automatically import all its associated Test Cases. You will instead simply choose the Requirement.
You can then run all the Tests for that given requirement and see from each Test Run and conclude if the product you’re developing fully meets that requirement.
As creating a suite automatically pulls in all the associated tests, your QA team doesn’t need to redo the work of populating all requirements. If your BAs and developers added the Test Cases for a requirement when they created it, the QAs can use it. This is the benefit of a single source of truth model. Your teams can benefit from each other’s work.
Even if your Test Lead decides to create more Test Cases for that Requirements-based Suite, the Test Cases they create will be automatically linked to the requirement itself. So regardless of whether BAs, devs, or Test Leads are adding Test Cases, every team can contribute to the same group of Work Items.
If you use Requirements-based Test Suites, your team can create Traceability Matrices that show youhow your Test Cases align with your requirements and whether a Test Case has passed or failed for any given requirement.
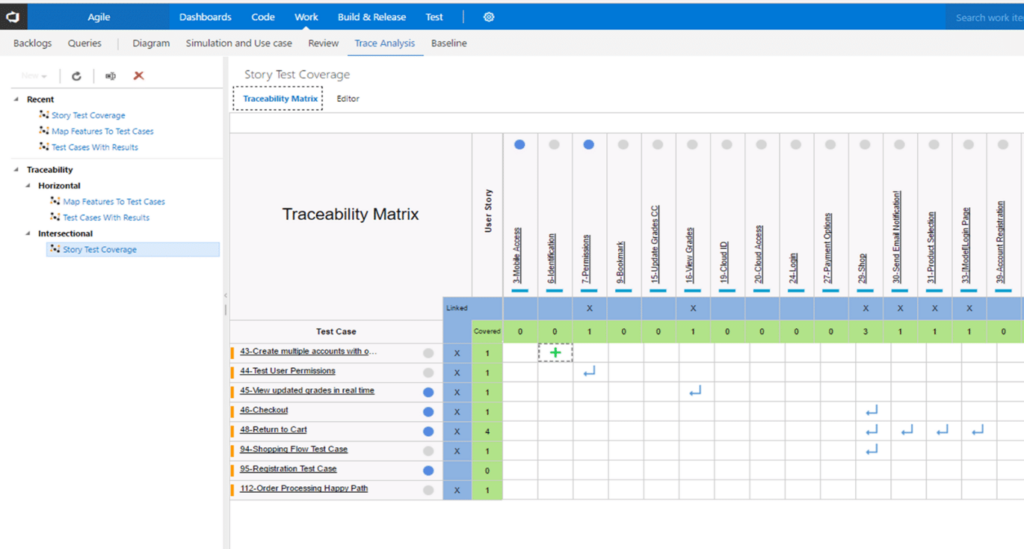
With more advanced solutions, you can even export and share explanatory reports of your tests.
2) Query-based Test Suite
When you make a Work Item query and select which test cases to include into your suite, you create a Query-based Suite. Azure DevOps automatically adds all test cases that meet these criteria to the suite.
When do you use a Query-based Test Suite?
In some cases, teams run tests on all the Test Cases that are currently in each iteration, or run tests on everything with a given tag, or some other criteria. These conditions are not necessarily tied directly to a given requirement and you can only satisfy them through a specific query.
Unlike Requirements-based Suites, which pull in all tests associated with a requirement, Query-based Suites give teams the ability to create a Test Suite using any criteria available.
If you are creating this type of Test Suite, it asks you how you want to pull in Test Cases and allows you to construct an ad-hoc query to do so. It allows you to pull in the Test Cases that match specific criteria. It is important to note that this does not use the queries your Business Analysis team would create in Azure DevOps. But the interface for constructing this ad-hoc query is nearly identical.
3) Static Test Suite
Static suites are logical containers where you can add any tests you like. They aren’t connected to any requirements or queries.
They are useful when you may need to create multiple levels of nested Test Suites. Or you may need a place to create and experiment with ad-hoc tests.
How to Build a Test Plan
Test Plans help your team to structure how tests are run so that your project fulfills the quality standards. You will create both Test Plans and Test Suites for all the requirements for every iteration below.
The steps are as follows:
Step 1:
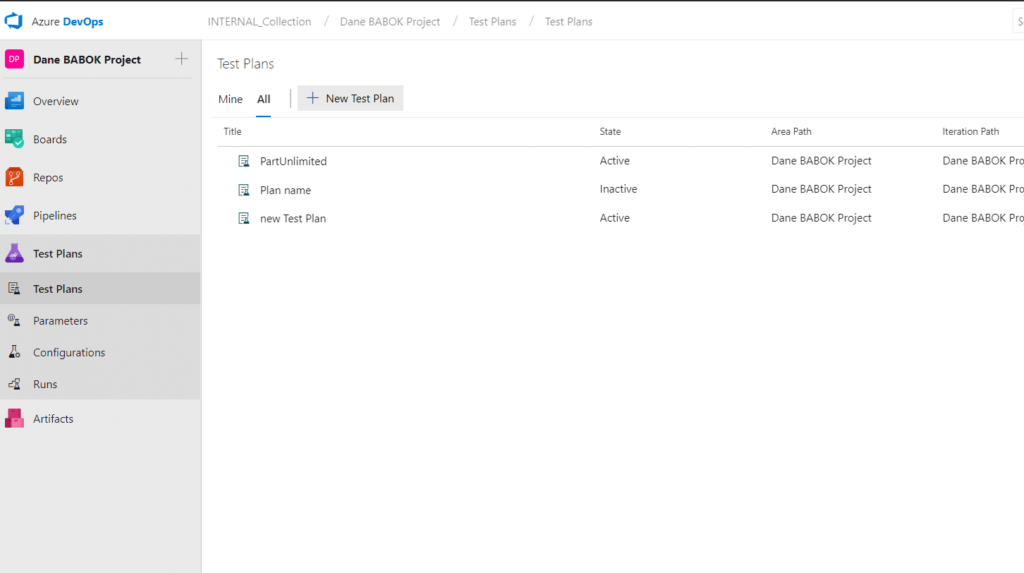
To build a Test Plan called “Given Iteration Test Plan,” go to the Test Plan tab on the left panel of your Azure DevOps interface. Select “+ New Test Plan.”
Name this Test Plan “Test Plan for Iteration 1.”
Select if you would like this specific Test Plan to be for a given area path or iteration. Otherwise, you can leave this blank (in these example images those two fields are left blank as the default options.)
With the test plans created, it’s now time to create a suite.
Step 2: Add Test Suites
Since the aim is to test all the requirements from a given iteration of a product are tested, you will add Requirements-based Suites.
When creating a Requirements-based Suite, you will pull in Test Cases that already exist for the given requirements. Otherwise, you will have to add new Test Cases to a requirement before adding it to a Requirements-based Test Suite.
We don’t want to bring in requirements, we want to bring in the Test cases associated to requirements. This point is just a reminder that Even when you build a Requirement-based Suite, you are creating a group of Test Cases, not requirements.
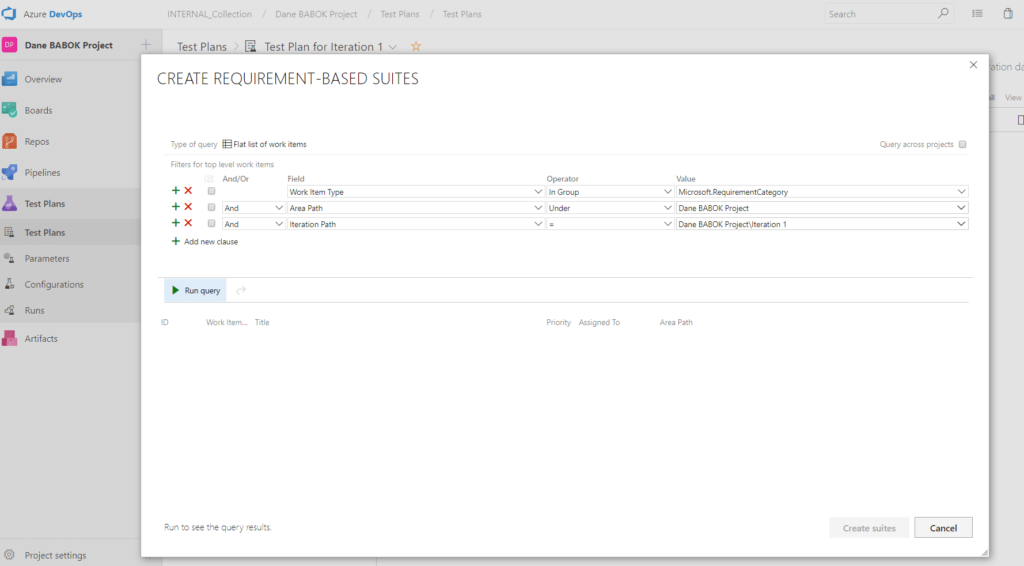
So, let’s create Test Suites (groups of Test Cases) for each of the requirements in iteration 1.
Step 3: Run Query
Above you can see the query you would need to build to pull in the Iteration 1 requirements, then you can simply click “Run Query” as shown above.
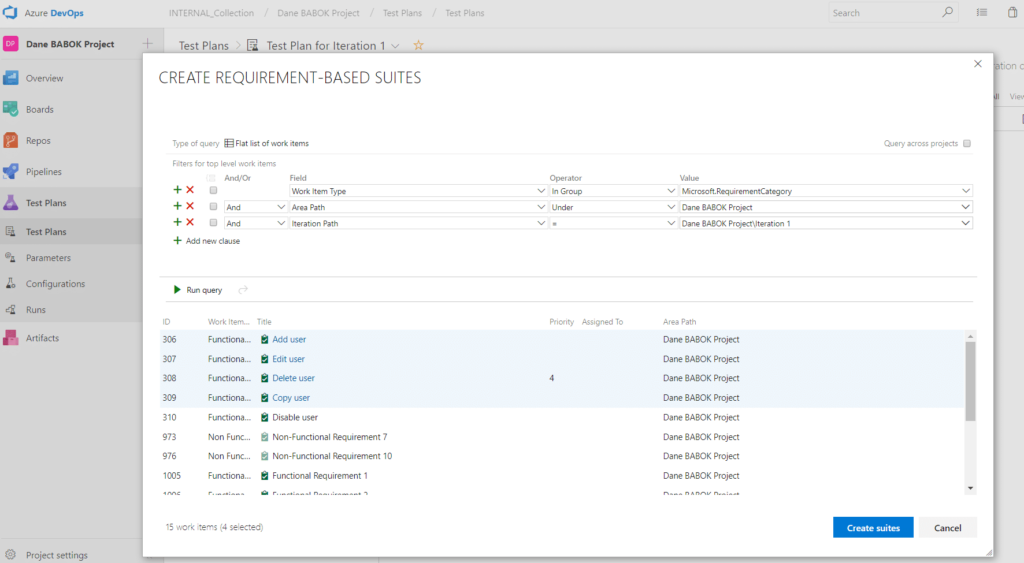
When you run the query and see your Iteration 1 Work Items, select a few.
Since each Work Item above is a functional requirement and you have chosen to create Requirements-based Suites, you will create four Test Suites, one for each requirement.
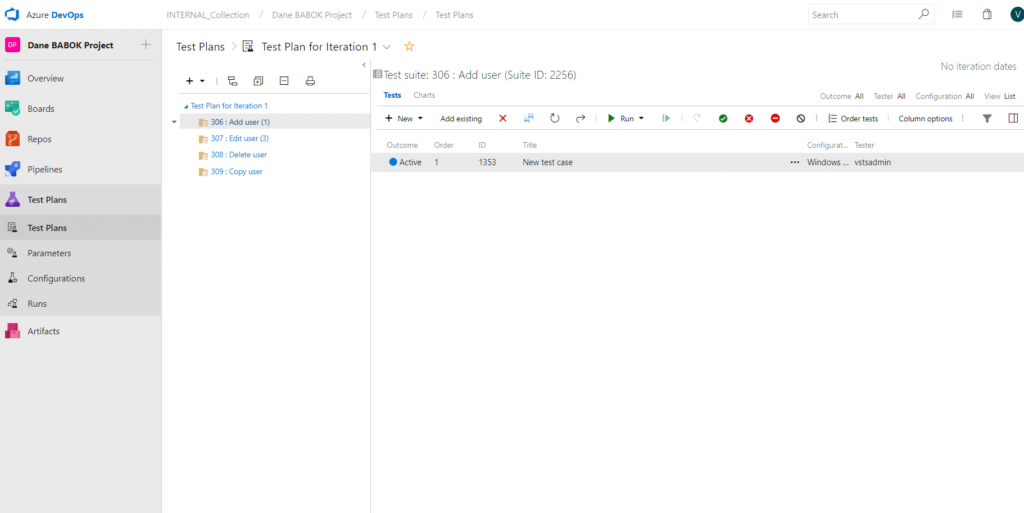
Let’s look at the outcome of clicking the blue “Create Suites” button above.
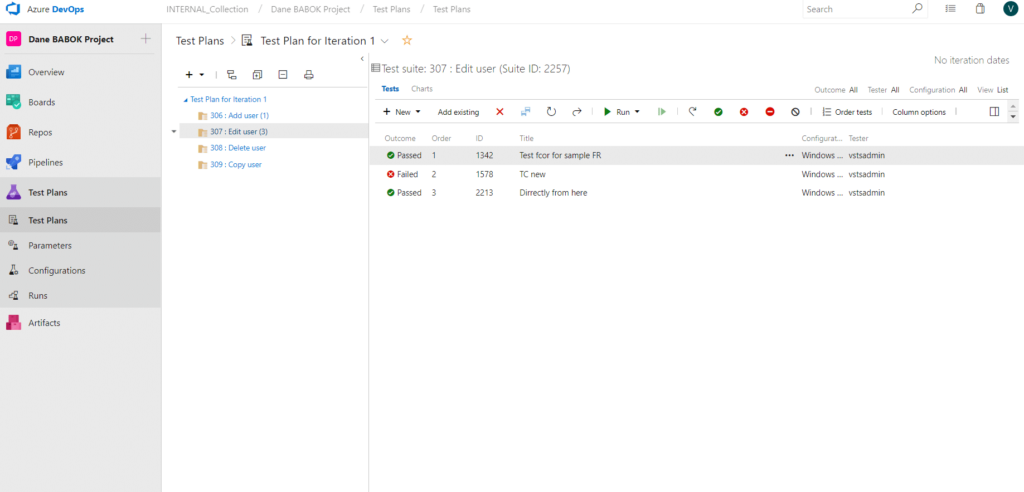
In the image above, you see that Test Suites for Work Items 306 and 307 have numbers in parentheses next to them. They represent the number of Test Cases they contain, one and three respectively.
Running Your First Test Plan
Now that you have a Test Suite for all the necessary requirements, you can either run the tests or add in Test Cases to fill out the Test Suites for those requirements.
The action of “running the Test Case(s)” on a Test Suite to see if they pass or fail is known as a Test Run. A Test Run is the outcome of running one or multiple Test Cases.
Let’s do a Test Run of one of our Test Suites.
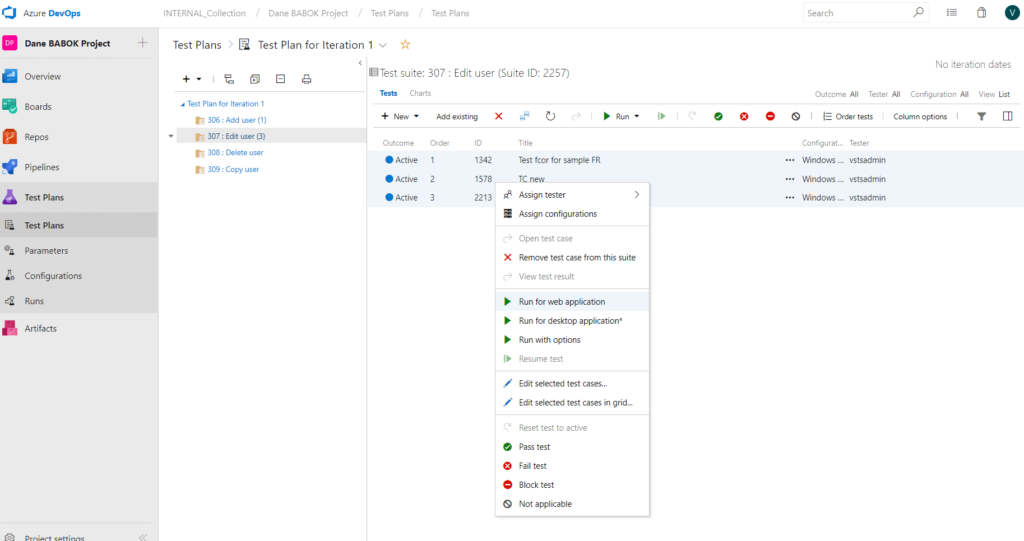
Right click on the Test Cases within Work Item 307 and click “Run for web application.” With the Chrome browser extension, you can run these Tests within Chrome itself.
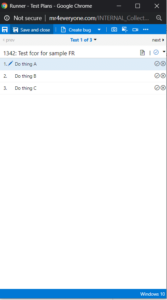
Azure will launch a new window for your Test Run (see below).
If you drag this window beside the window containing the web application you are currently testing, you can see the individual Test Steps and pass or fail them as you test them. If the application or function fails one of the Test Steps, you can add your comments on why it failed.
You can even record the screen or take screenshots to better illustrate the failure. This information is now attached to the Test Run.
By testing and commenting on how the application or product you are testing works, you allow your team to provide meaningful contributions to fix the issues you spotted.
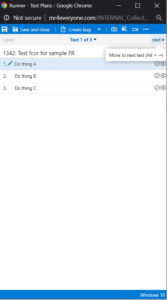
Once you have completed a Test Case (whether passed or failed) you’re ready to go to the next Test Case in their Test Run. To do this, click “next” as shown below.
When you complete your Test Suite, you can Save and Close your Test Run. You will be able to see their outcomes in the “Runs” tab of Azure DevOps Test Plans.
Understanding Test Plan Results
Let’s say you’ve ran the following Test Plan (Requirements-based Test Suite 307) from our example above with the following results:
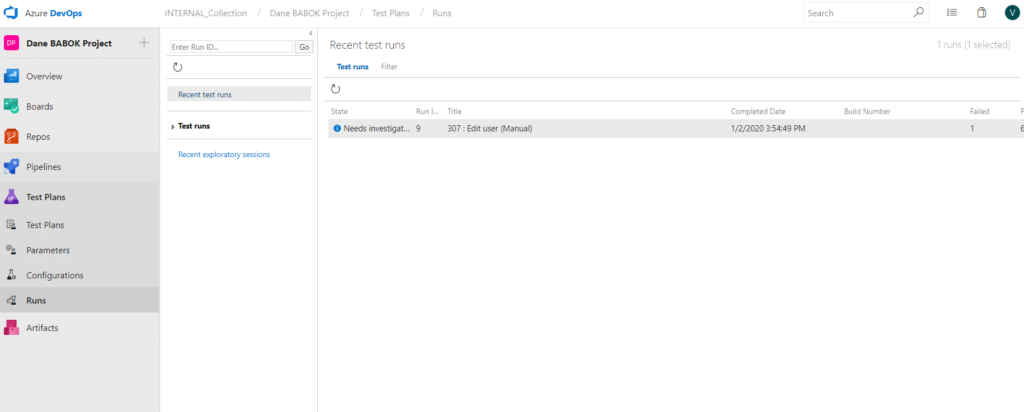
You can choose to use this same screen to identify what passed and what failed, but if you want to see the contributions of your testers, you can use the Runs view under Test Plans (see left side of the picture above).
Here you can see the Test Run that “Needs Investigation.”
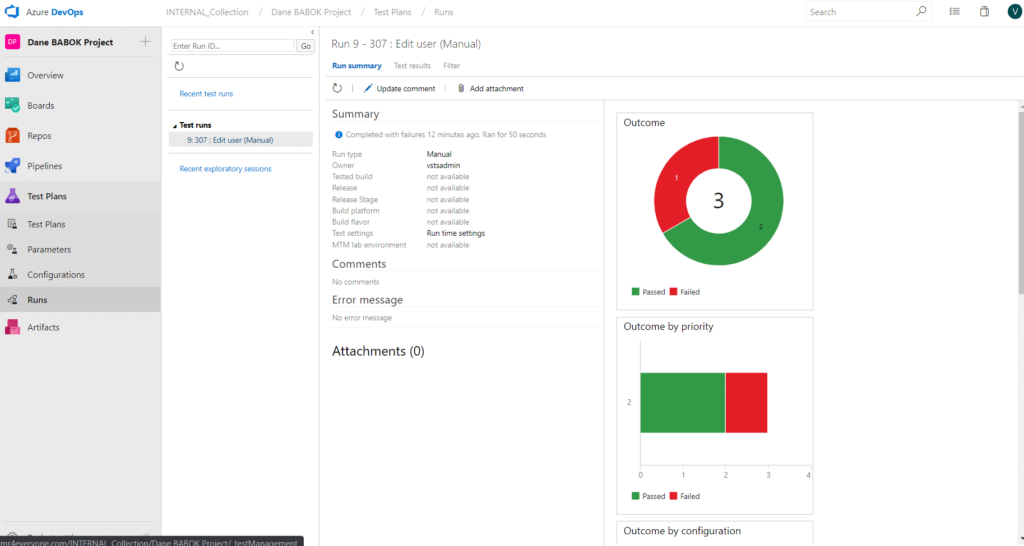
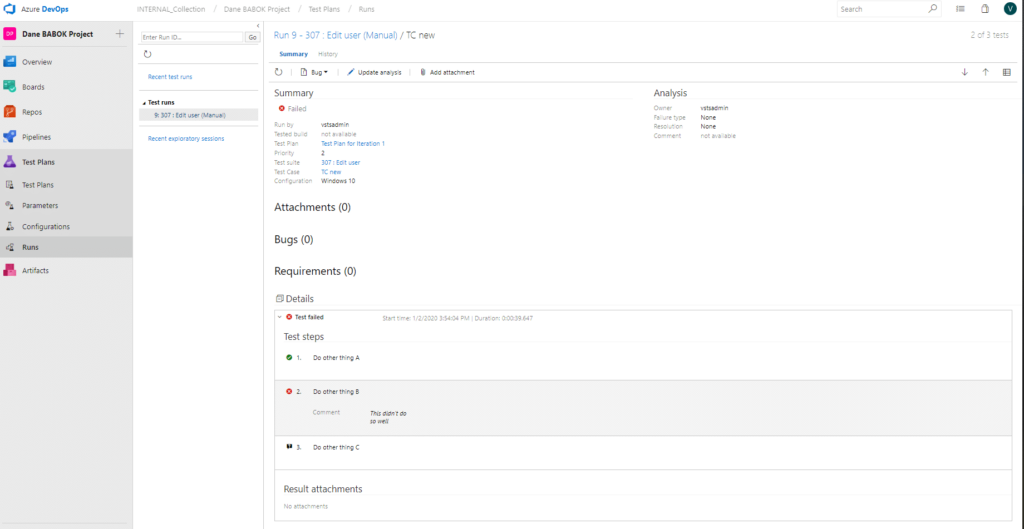
Clicking on the Test Run, you see in “Recent test runs” and you will see the following Test Run page with three tabs. Those tabs are “Run summary,” “Test results,” and “Filter” and you can see them below.
Test Runs is where you find the attached screenshots, recordings, videos, and/or comments added by your testers. They aren’t available in the “Run summary” tab.
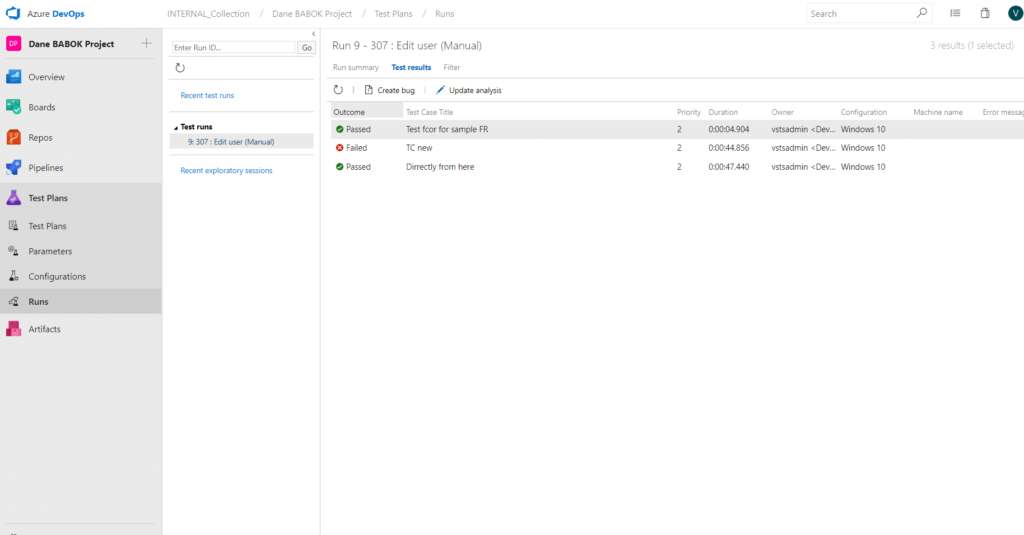
To see the contributions of your testers, navigate to the “Test results” tab, as shown below.
Select your failed Test Case to access the information collected by a given tester during their Test Run for that Test Case.
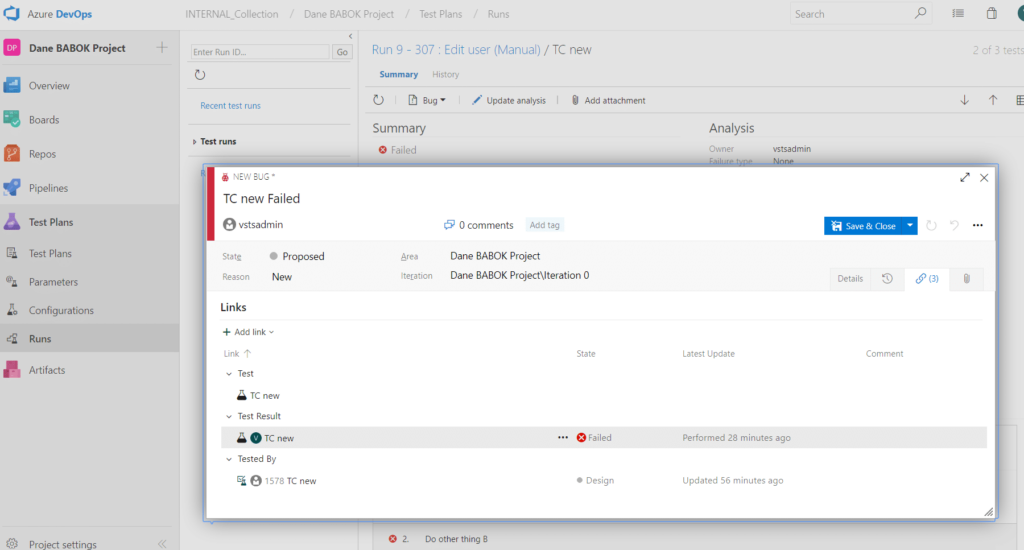
To use the feedback given by your testers, you can create bugs by going to the previous screen, which shows a failed Test Case and lets you “Create a Bug.” Doing so will allow you to build a bug that is has a relationship called “Test Result” (shown below) that links directly to the Test Run failed Test Case.
Documenting your Test Plan
Most large companies doing technically intensive work also need to document the work employees are doing.
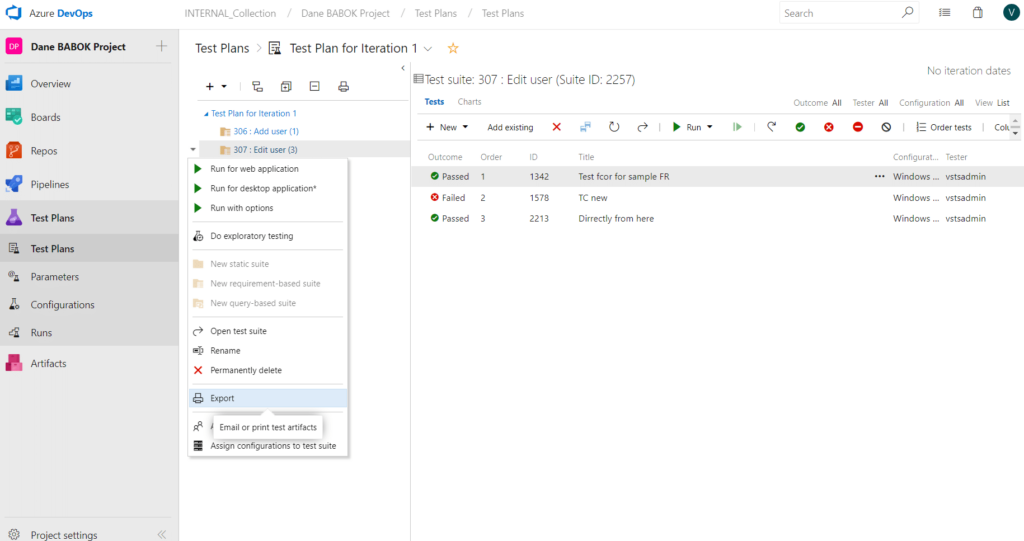
You can find a lot of deeper-dive information regarding a given failure of an individual Test Suite, or the Test Plan in the Azure DevOps project itself. Azure DevOps will help you create a document for your Test Plan that will include all the links to the necessary places (like the Test Run showing the details of a failure) inside your project.
How you export a given Test Suite’s results in document format is shown below.
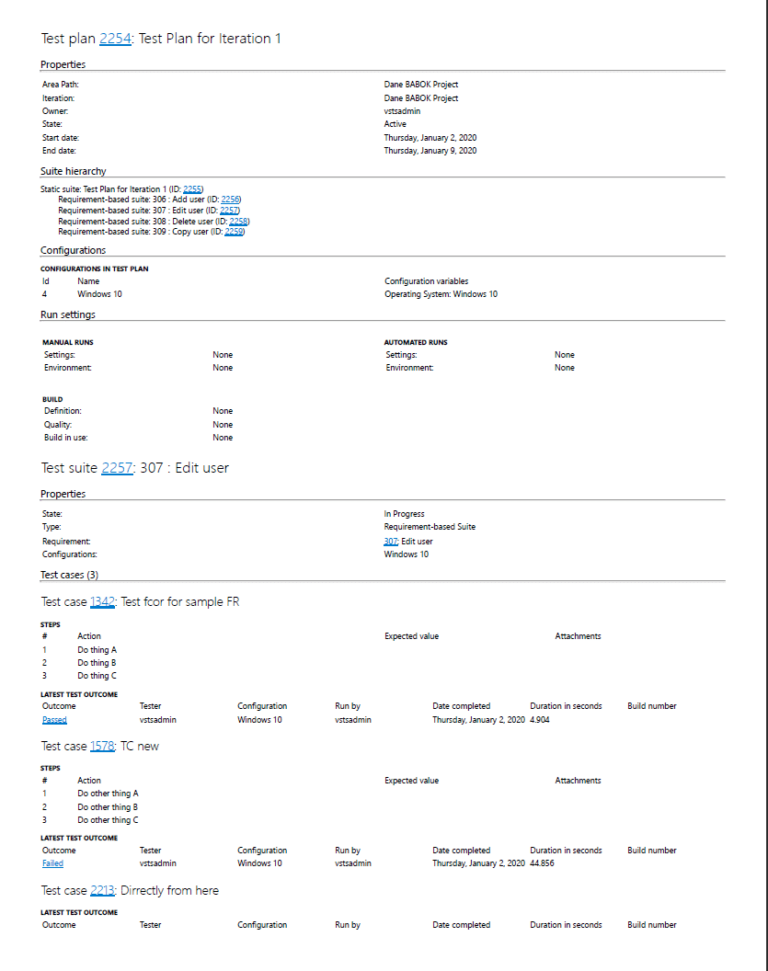
When you export this document, you can choose “Print” to create a PDF that looks like the screenshot below:
The links shown above help you step through to the full details of a given outcome.
For example, Test Case 1578 (found near the bottom of the screenshot above) has the “Latest Test Outcome” value of “Failed” with a link. This link will take you to the Test Runs page where you can see the contributions of your testers.
But this documentation is not enough. Many users like to create the common version of a Test Plan document that contains all the context surrounding a given Test Plan. If you need to build a document that outlines the scope, risks, purpose, strategy, etc., you might want to use Microsoft Word.
Documentation isn’t known as one of Azure DevOps’ greatest strengths. But with a solution like SmartDocs, you can turn work items, Test Cases, Test Suites, Test Plans, and a lot of associated information into readable and shareable documentation.
The below video will show you how.
Building Test Documents from Azure DevOps
In this video we cover how you can build the documentation surrounding your Test Plans from within your Azure DevOps project using Modern Requirements4DevOps Smart Docs module.

