2020
Continue readingUnderstanding the Admin Panel: Licensing and Module Configurations
As an administrator, you can control how users access and interact with their Modern Requirements4DevOps projects by applying admin settings.
Continue readingParticipate in Requirements Authoring Using Email Monitor
Participate in Requirements Authoring Using Email Monitor

The Email Monitor feature provides access to creating Work Items in your Azure DevOps project through a medium that that is not native to Azure DevOps. That is, it allows you to communicate with your project via email. Teams often encounter situations where they are emailing about requirements, change request or bugs that should be created, and often they are able to use emails to drive towards a conclusive requirement that should be added into their project.
With the Email Monitor feature your team can now turn this external communication into a Work Item directly.
For use cases and the configuration process of Email Monitor, please watch the video.
You can access the configuration page of Email Monitor by going to the Collection/Admin settings – Modern Requirement4DevOps Extension – Services – Email Monitor.
By enabling the Email Monitor feature in the Modern Requirements4DevOps extension panel, you can specify a Monitor Email address that can intercept and create any work item that are emailed to it. Since the system will try to capture every email sent to the Monitor Email, it is a good idea to use your Monitor Email solely for the purpose the Email Monitor.
You are also required to provide an Admin Email address just in case when the system could not recognize the emails and a notification email will be sent to the Admin Email.
You can specify what WorkItem Types you want to create in your project from those captured emails.
Titles of the emails sent to the Monitor Email will always be mapped into the titles of Work Items to be created.
Team Project (Default) allows you to choose a default project where you want to add the Work Items to.
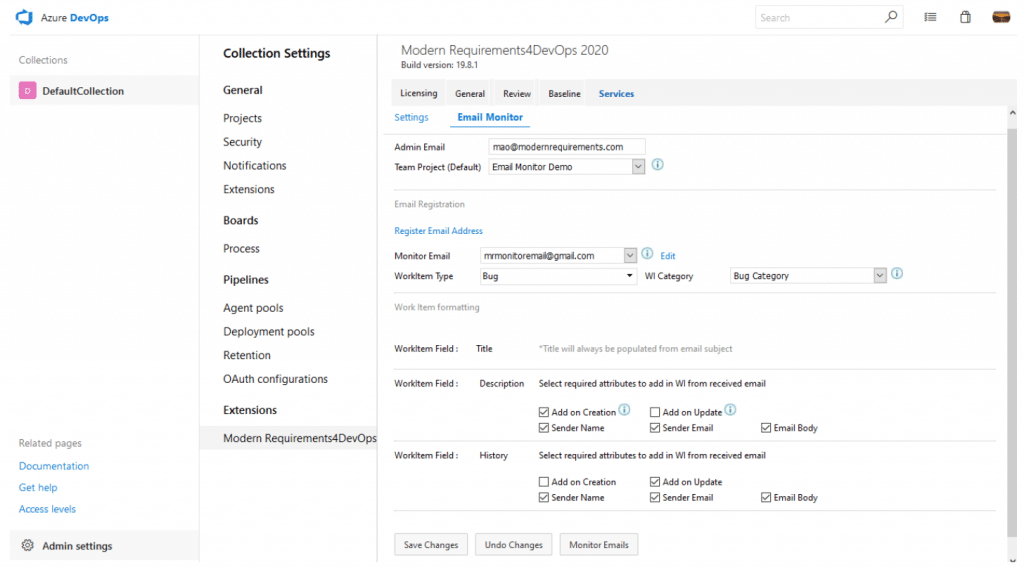
Add on Creation and Add on Update help you configure when you want to add the requirement to the project.
For the Description Field:
If the Add on Creation is checked, it means the system will use the initial email to create a new work item and the email body will become the description of the created Work Item.
If Add on Update is checked, it means the existing description of the created Work Item will be overridden by future replies regarding the same Work Item.
For the History Field:
If the Add on Creation is checked, it means the body of the initial email will be mapped to the Discussion section of the created work item.
If Add on Update is checked, then all back and forth replies regarding the same Work Item will be added to the Discussion section.
Sender Name, Sender Email, and Email Body allow you to set what content you want to add in associated Description or the Discussion section.
Use Case for Email Monitor Service
The most common use case for the Email Monitor feature is as follows:
I have a large organization and I would like all members of my organization to add any bugs they find in my software to my Azure DevOps project.
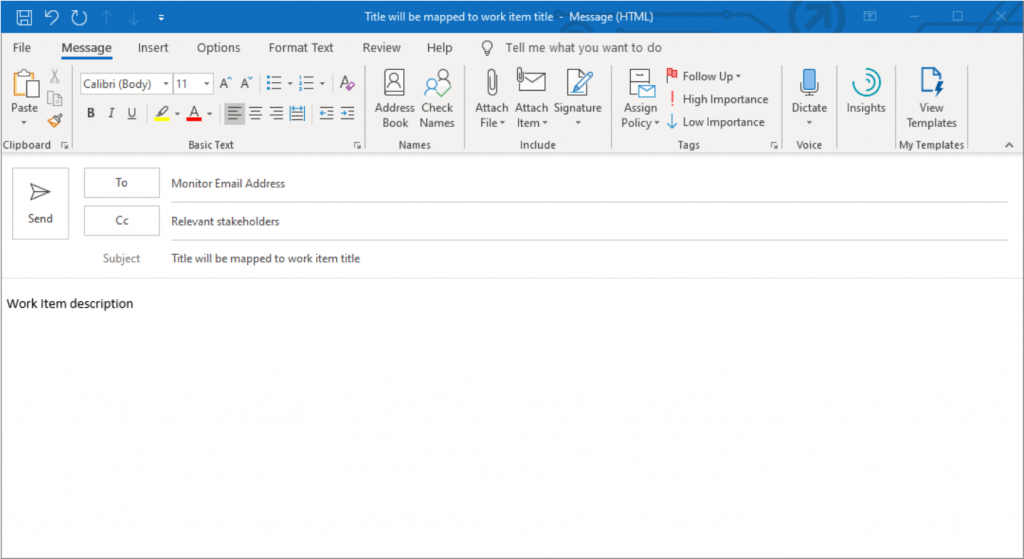
With Email Monitor fully configured with the bugs@myorganization.com, any relevant stakeholders can simply send an email to bugs@myorganization.com and I could specify that a Bug Work Item should be created in my project.
At the same time, the email that triggered the bug’s creation is also sent to the relevant people of that project. The relevant members can now participate in the discussion of that Work Item via email, and all email communications will be added to the Discussion properties of that Work Item within your project.
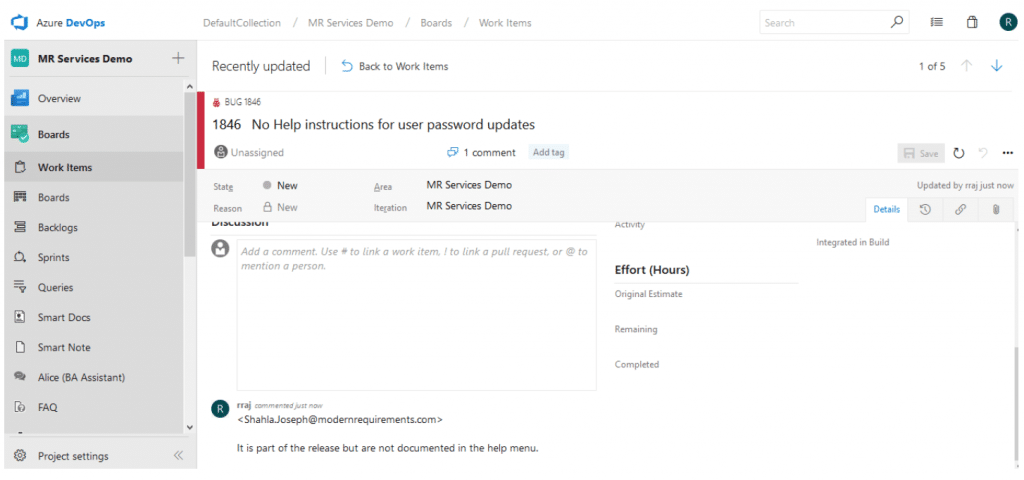
This unique feature allows people to contribute to your project’s success without needing to fully access your Azure DevOps project. External parties can now become part of the discussion about a Work Item, and does not require you to provide that person access to your project.
Some other scenarios you might be interested in
Adding Work Items to projects other than the default project
If sender does not specify a particular project name in the email body, the mapped email will be added to the default project. If senders want to add the requirement to another project under the same collection, they will need to include [ProjectName=GCD] in the email body (GCD is a sample project name).
Multiple Work Item Types
We understand that your project stakeholders might want to add more than one types of Work Items by using Email Monitor. This can be achieved too! You can simply select multiple WorkItem Types. For instance, now I select User Story in addition to Bug. When your team send emails to the monitor email box, they can use [WIT=bug] or [WIT=user story] in the email body to specify which Work Item type the created requirement should be. Without specifying the Work Item type in the email body, the system will try to map the email to the Work Item type which falls into the Work Item category you have selected in the WI Category section.
Adding extra content to an existing Work Item
After the initial email was captured by the system, by default, all future replies can be added as discussions of same Work Item. In addition to that, senders can add [wiid=1997] (1997 is a sample Work Item ID) in the email body to add new content to the targeted existing Work Item.
Of course, you can use more than one of those special commands in an email based on your needs.
Managing Suspicious Requirements with Automatic Flagging
Managing Suspicious Requirements with Automatic Flagging

How does Dirty Flag / Suspect Link work?
This feature works by allowing you to monitor Work Items which meet certain preconditions. When these Work Items change, the monitor feature will mark any linked Work Items as suspect.
Let’s consider an example:
User Story 1 has just been moved to the ‘Completed’ state. If the Suspect Link can be configured to trigger a flag if any changes are made to user stories in a “Completed” state (i.e. a change to a field such as ‘Description’).
This means that if User Story 1’s Description field is changed in the future, it will flag all of the requirements that are linked to it with a Dirty Flag.
This allows your team to easily identify if a requirement that matches a certain set of criteria (which you specify) changes. Once identified, the configured work items directly linked will be flagged by the Dirty/Suspect.
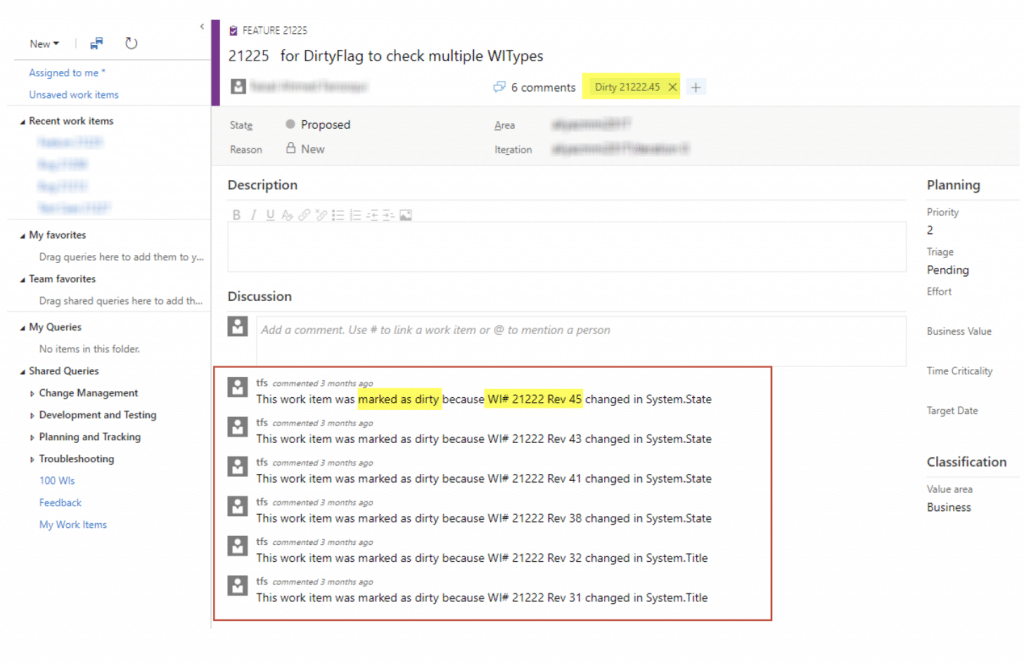
To continue with our example, if User Story 1’s Description field changed, we could Dirty Flag all of the directly linked Test Cases that might need to be changed to test the new criteria changes.
The Dirty Flags that get set on those Test Cases would take the shape of a Work Item tag.
Tags show up in the Standard Work Item editor of Azure DevOps. You can also personalize the Column Options in the Work Items and Backlogs module to view a group of Work Items in which some may be marked by the Dirty Flag.
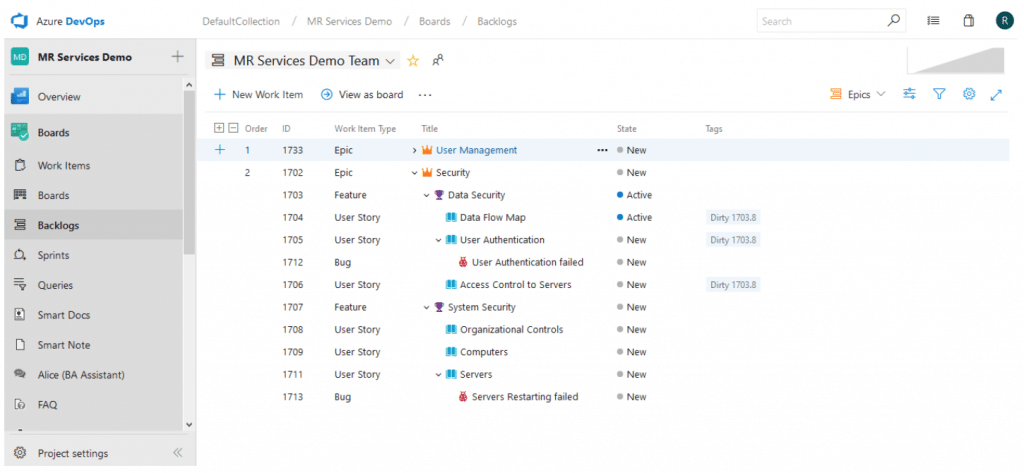
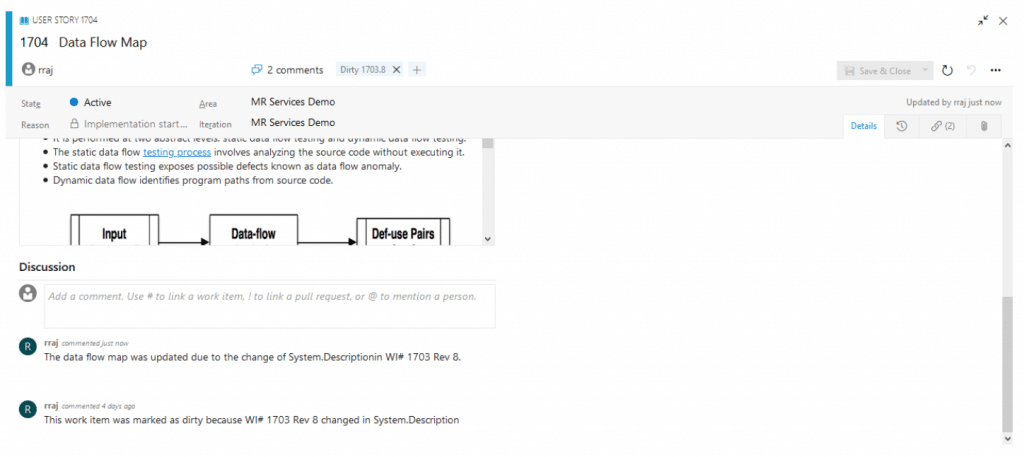
In the case of the Dirty Flag tag that is set on Work Items, the tag that is applied includes both the changed Work Item’s ID, and revision, so that your team can easily identify which requirement was it that changed and fired the Dirty Tag / Suspect Link functionality.
Dirty Flag tags could be manually removed when relevant stakeholders have reviewed the impact and made necessary updates. The best practices we recommend here is to add another comment explaining that now the Dirty Flag is removed due to necessary updates have been accomplished or no updates are required.
For more details and the configuration process of Dirty Flag/Suspect Link, please watch the video.
How to Make Your Requirement IDs More Descriptive and Distinctive Using Custom ID
How to Make Your Requirement IDs More Descriptive and Distinctive Using Custom ID

Modern Requirements4DevOps offers the functionality to add Custom ID’s to Work Items. The intent of this feature is to make a Work Item field more readable and recognizable. For example “PX-REQ-00001” for the first requirements work item in Project X.
Our Custom ID feature offers the same benefits alongside the added benefits of using the Custom ID in the Queries module.
Custom ID’s can be setup as a custom property that exists on each of your Work Items. The Custom IDs is not designed replace the work item ID, instead it complements it.
The Custom ID property offers an easy method of identifying several necessary information of a given Work Item all within one field. It also proves to be an incredibly useful tool for identifying a requirements source in cross-project queries.
By allowing you to consolidate the information into one field you make a Work Item more approachable to less involved users. The Custom ID capability adheres to the following guidelines:
Work Items can be assigned a unique code based on different Work Item types. For example, a Requirement Work Item type’s code could be REQ, a User story Work Item type’s code could be US, and a Bug Work Item type’s code could be BG.
You can create the starting number that your Work Item types will increment from thereafter. For example, you can dictate that User Story Custom ID numbering should start at 1 or 10000 and it will increment every User Story’s Custom ID by thereafter.
You can also add an optional project prefix for any Custom ID. For example, a project name such as “Project X” could have the prefix PX assigned to it.
Finally, you can choose to include the Scope of any Work Item. The ID number is not repeated in the scope; the scope can be Team, Project or Collection. Scope guarantees the custom ID will be unique within the scope.
Using the example covered in the above guideline, a Custom ID for the first (00001) Requirement Work Item in Project X would be “PX-REQ-00001” – which is a concatenation of the project prefix + Work Item type code + number.
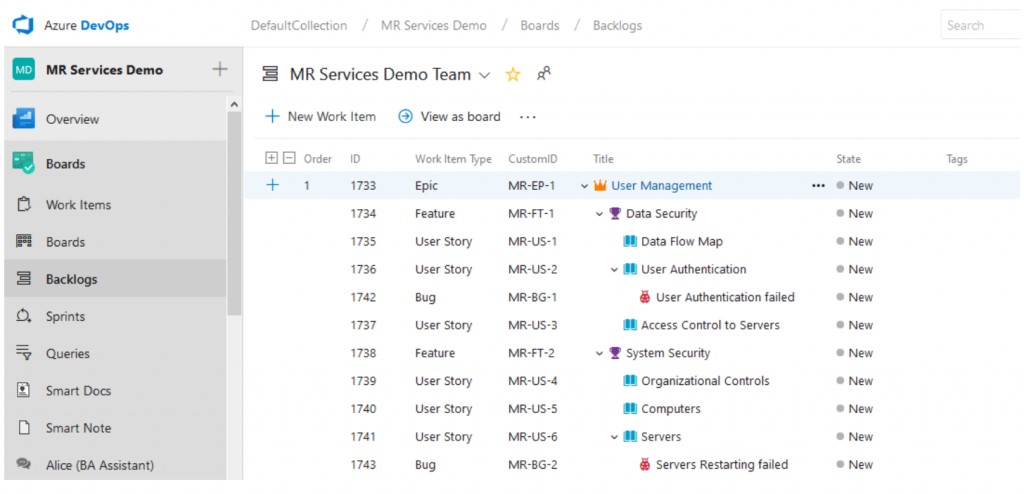
For more details and the configuration process of Custom ID, please watch the video.
Facilitate the Medical Device Design Controls with Modern Requirements
Achieve quicker compliance, shorter development cycle times, and faster value delivery
Continue readingDigital Project Manager: An Overview of Modern Requirements4DevOps
The Digital Project Manager: An Overview on Modern Requirements4DevOps
Detailed Overview & Explanation Of Requirements Management Features

What is Modern Requirements4DevOps?
What is Modern Requirements4DevOps? Read on to discover how Modern Requirements4DevOps works—what problems it can help you solve and who uses it, along with a tour of its features, pricing, and integrations.
I’ll also explain how Modern Requirements4DevOps compares to similar tools.
Read the full article on Digital Project Manager.
Introduction to Rights Management
Introduction to Rights Management

What is Rights Management?
Rights Management is a new feature in MR2020 Release to control user access. The project administrator can grant or deny a group of users from accessing an MR module and its functionalities. Currently, Rights Management is available for three MR modules: Smart Docs, Baseline, and Reporting.
The Benefits of Using Rights Management
Flexible and customizable permissions allow project teams to maintain the appropriate balance of collaboration and control.
Whenever a permission change takes place, it will immediately impact every user team/group that is assigned the permissions. This ensures that permission settings can easily be updated and maintained as projects progress and teams change roles.
How to Access Rights Management
Rights Management can be accessed from the Modern Requirements4DevOps extension under Project Settings.
Group Features
The available features which you can set permissions for varies from module to module.
The available Group Features are as follows:
- Create /Edit Folder
- Delete Folder
- Create/Update Artifact
- Delete Artifact
- Create/Update Meta Template
- Save As Template
- Smart Report Generation
- Smart Report Designer
Permissions Selections
There are typically three types of permission access to choose from for each group feature:
“Allow”
“Deny”
“Not Set”
- “Allow”: Explicitly grants users the permission to access a group feature in MR module(s).
- “Deny”: Explicitly restricts users from accessing a group feature in MR module(s).
- “Not Set”: Implicitly denies users the ability to access a group feature in MR module(s).
Inherited Permissions
Teams/Groups can automatically inherit permission settings from parent Teams/Groups. Permissions Settings explicitly changed in the child teams/groups may override permissions inherited from parent Teams/Groups. Keep the following rules in mind:
- Inherited “Allow” values can be overridden to “Deny”.
- Inherited “Not Set” value can be overridden to “Allow” or “Deny”.
- Inherited “Deny” value cannot be overridden to “Allow”.
Permission Conflicts
When same user exists in more than one teams/groups, the following rules apply:
- “Deny” has preference over “Allow”.
- “Deny” has preference over “Not Set”.
- “Allow” has preference over “Not Set”.
Please watch the detailed tutorial video on Rights Management!
Using MatCal to Perform Mathematical and Logical Calculations in Modern Requirements Management
Using MatCal to Perform Mathematical and Logical Calculations in Modern Requirements Management

What is MatCal?
MatCal is a feature in Modern Requirement4DevOps used to perform mathematical and logical expressions on work items.
Why we need MatCal in Requirements Management
To manage the relationships between work item properties in a smarter way! It eliminates the manual efforts of doing the calculation outside the project environment and avoids risks of introducing incorrect calculation results to your projects.
Let’s look at a simple example here to illustrate a relationship between work item properties.
Business Value and Priority are properties of work item Feature. Normally, high Business Value leads to high Priority.
With the right configuration, MatCal could help you manage the relationship by automatically assigning Priority value based on the Business Value input.
Industry Use Scenarios
Scenario 1: Automotive Safety Integrity Level (ASIL) in ISO 26262

Scenario 2: Risk rating is automatically assigned according to Severity score and Occurrence score

Scenario 3: Priority rating is automatically assigned according to Severity score and Likelihood score

Please watch the video for extra usage scenarios and tutorials on MatCal!
Reusing Requirements
Requirements Reuse: An Effective Way to Facilitate Requirements Elicitation
Learn how to Reuse Requirements in Azure DevOps

Azure DevOps is an incredible platform that provides a single-source of truth.
For many teams that statement alone is enough to consider using the world’s leading ALM platform for their requirements management. Being able to tie development tasks to requirements, and those to Test Cases is hard to pass up.
But what if you don’t need all of the features of a full ALM platform?
What if you only need a solution for your Requirements Management needs?
You can use all of the rich features of Modern Requirements4DevOps to turn your Azure DevOps project into a full-featured Requirements Management solution. One of these features is the ability to reuse requirements across different projects, collections, and servers using the Modern Requirements4DevOps Reuse tool.
Looking to reuse requirements?
You’re in the right place.
What you’ll learn in this short article:
- Benefits of reusing requirements
- The two types of reusing requirements
- How reusing requirements can be used effectively
The Benefits of Reusing Requirements
When we talk about the benefits of requirements reuse there is one thing that needs to be addressed first.
The most common question I get from hardware teams is “How could this possibly benefit teams who aren’t software-related?”
So before we begin, requirements reuse is not just for software teams.
Requirements reuse is a topic that often catches people’s attention.
This is because in the world economy we are seeing companies focusing on given domain or areas within given industries. This leads to companies building products within a specific domain, or around a given solution, and really narrowing in on the few things they can be really successful at.
This means that as you build projects, solutions, or systems, often a team can reuse elements of a previous project. This is where requirements reuse fits into the picture.
By enabling a team to reuse those requirements in the next project they are able to reduce the amount of overhead required in getting started in a new project.
For some people this might already be obvious.
What might not be obvious, however, is that reuse can also be a great way of handling requirements that are scoped above the project level. This would include non-functional requirements, or risks that need to be considered as a company-wide mandate. This would even go so far as to allow your team to reuse requirements whose purpose is strictly regulatory or compliance-centric. This functionality can be extended to software and hardware teams alike and can even help teams product teams devoted to a physical component or deliverable.
The Two Types of Reusing Requirements
Reusing Requirements by Reference
Reusing requirements by reference is a quick way to introduce existing requirements to your project by simply building links with them. By doing this, you could have direct access to those work items and review all the associated content, links, and attachments without actually copying them within or across projects.
Reusing Requirements by Reference
Reusing Requirements by Copy
In Azure DevOps there is very limited functionality for copying requirements, or other work items, from one project to another. But when you add Modern Requirements4DevOps into your Azure DevOps environment, requirements reuse meets its full potential.
When discussing the Reusing Requirements by Copy, there are three major approaches to consider.
Reusing Requirements by Copy
How to Reuse Requirements Effectively
After watching the above videos it is obvious that the Modern Requirements4DevOps Reuse tool is effective for reusing requirements.
It offers full control over the requirements you are choosing to reuse, allows you to apply customization to those requirements, and allows you to link the requirements to the source work item.
This means no matter where you want to send requirements, you can do so using the Modern Requirements4DevOps Reuse tool. But there are some ways that you can use the Reuse tool more effectively.
The first notable mention is by pairing the reuse tool with the Modern Requirements4DevOps Baseline tool.
What is a Baseline?
Many teams use Baselines of requirements and don’t even realize they do.
A Baseline is a snapshot of Work Items at a given point in time.
For many teams they simply use Microsoft Word document versions as a baseline.
When talking about capturing requirements at a given time, there are many reasons why the Modern Requirements4DevOps feature is better than the traditional Microsoft Word approach. With Modern Requirements4DevOps Baselines, you are able to capture a set of, work items as they were on any date of your choosing.
This means if you want to capture your requirements as they are two weeks ago, you can easily create a Baseline for those requirements on that date. This lends itself directly to the benefits of the Reuse tool added by Modern Requirements4DevOps.
By combining the Reuse tool with our Baseline, you can not only choose the set of requirements you want to reuse but also the version of those requirements as well. This allows you to take the best and most applicable version of your requirements forward to your next project.
The next notable mention is to use the prefix / postfix / and other operations effectively when reusing requirements.
When reusing requirements, the Modern Requirements4DevOps Reuse tool allows you to customize how the requirements being reused will appear in their destination project.
The screen which allows you to do this can be seen below:
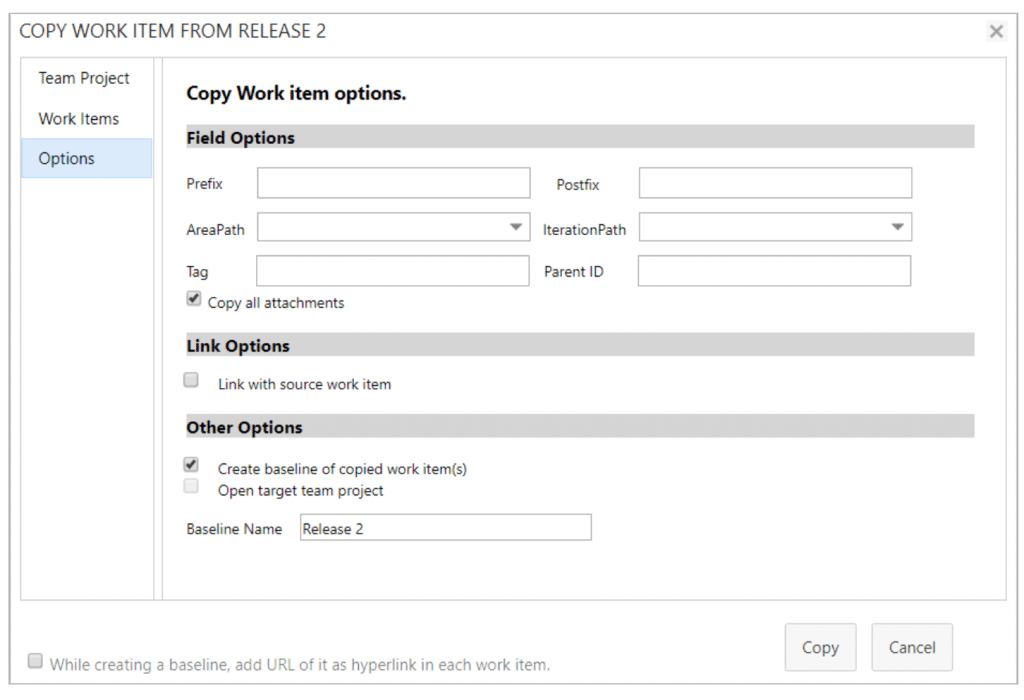
Using the above feature will allow you to easily add a prefix or postfix to the requirements once they reach your chosen destination project. As seen above, you can also choose to send these requirements to a specific area path (like hardware or software for instance), or even into a given iteration so you can decide when these requirements get handled.
The most commonly used feature in the field options, however, is the ability to add a tag.
Often when you are sending requirements from one project to another you want to be able to easily identify and trace those requirements in your destination project. Adding a Tag will allow you to do this.
What is the link with Source Work Item Option?
This option allows you to establish a link between the work item you are reusing and the work item you create in your destination project.
What link does it create?
It links your new destination work item to your original work item via the “Related” link or any link type that you have configured in the admin area.
In the below image you can see a Test Case I have copied from project to project, using both the prefix “CL- ” and the “Link to source work item” options set.
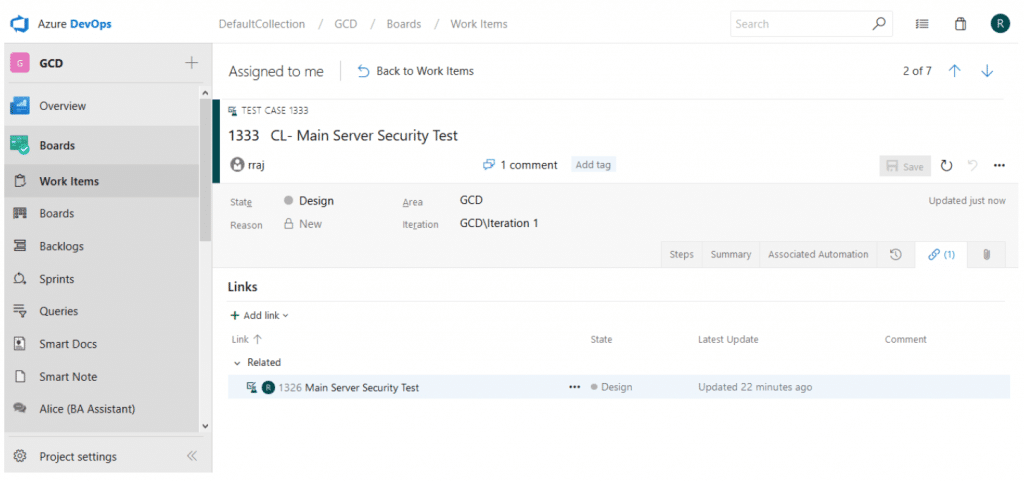
Using the “Link to source work item” feature allows you to easily trace requirements back to where they were pulled from. While there are many use cases for this feature when moving requirements directly from project to project, this more advanced use cases are for when you are moving requirements from a library or repository into a project instead.
How to merge copied baselines?
Baseline is a very useful tool no matter you want to reuse a single work item or a long list of work items from your source project/library. In Modern Requirements, you could create links between your source and copied works items so that you could locate the origins of these copied work items.
Although there are links in between, the copied work items are still considered to be independent of the source work items, which means any changes you make to either the copied or source work items will not impact their counterpart.
You might want to ask: how to synchronize the changes when necessary? Assume you have a library where all your design specification work items are saved, and you have reused them in 5 different projects. If now you have to modify some designs in the library, and you want all copied design specifications to be synchronized, you can simply use the Merge functionality, which is located under Source Copied Baseline(s) or Target Copied Baseline(s) in the Details tab of the Baseline module.
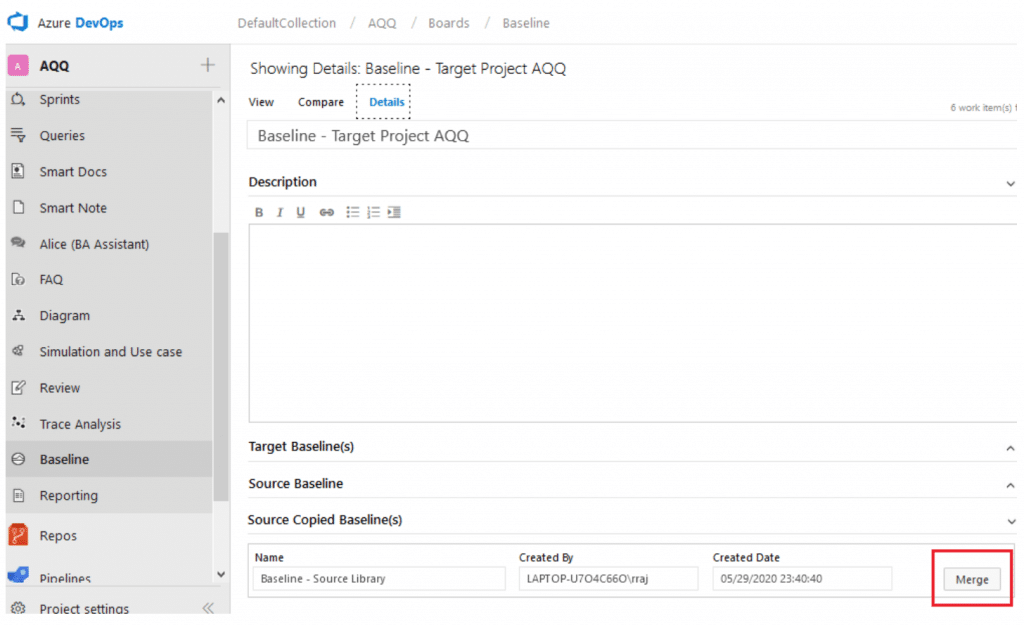
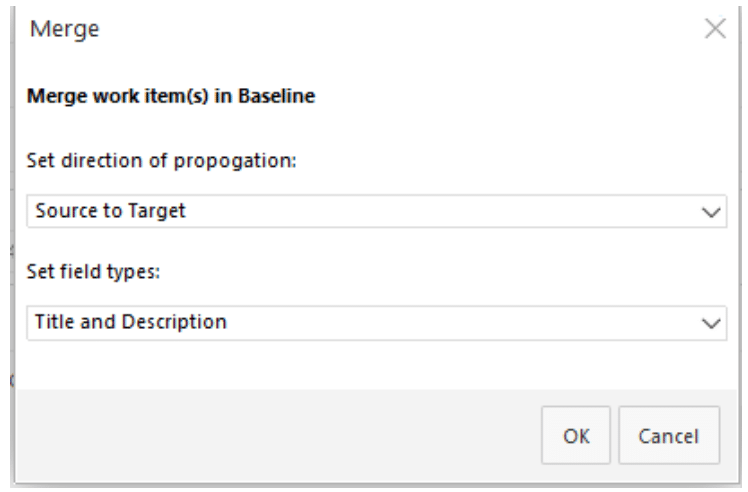
Still remember the definition of a baseline? A snapshot of selected work items at a point in time. So no matter what changes we have made to the baselined work items, the saved snapshot won’t change. So even if we have merged the baselines, the changes are done against the latest versions of the work items, not to the baselines themselves. Sounds like a little bit hard to understand?
Please watch the 5-minute Merge Copied Baselines video.
Merge Copied Baselines
Want to experience reuse's full potential?
Try Modern Requirements4DevOps for free today.
We offer you the ability to try our Requirements Management solution in your own Azure DevOps environment, or in an environment we supply that includes sample data.


